Spring-Rest-Docs
- 테스트 코드를 기반으로 Restful API 문서 작성을 돕는 도구
- Asciidoctor를 사용하여 HTML 등 다양한 포맷으로 문서를 자동 출력할 수 있다.
- API Spec과 문서화를 위한 테스트 코드가 일치하지 않으면, 테스트 빌드를 실패하게 되어 테스트 코드로 검증된 문서임을 보장할 수 있다.
Swagger
- @ApiOperation 등 코드에는 영향을 주지 않지만, Swagger를 위해서 지속적으로 추가 코드를 작성해야 한다.
- 명세를 위한 코드들이 너무 많아 가독성이 떨어질 수 있다.
- 구조가 변경되었을 때, 명세도 같이 변경하지 않으면 초기 명세와 달라질 가능성이 존재한다.
프로젝트를 진행하면서, API 문서 자동화를 위해 Swagger와 Spring-Rest-Docs 중 고민하다 위와 같은 이유로 Spring-Rest-Docs를 선택하였다.
실습
환경: SpringBoot 2.7.5
1. build.gradle 세팅
plugins {
    id 'org.asciidoctor.jvm.convert' version '3.3.2'
}


configurations {
    asciidoctorExtensions
}

ext {
    set('snippetsDir', file("build/generated-snippets"))
}

dependencies {
    asciidoctorExtensions 'org.springframework.restdocs:spring-restdocs-asciidoctor'
    testImplementation 'org.springframework.restdocs:spring-restdocs-webtestclient'
}

test {
    outputs.dir snippetsDir
}

asciidoctor {
    inputs.dir snippetsDir
    sources {
        include '**/api-docs.adoc'
    }
    configurations 'asciidoctorExtensions'
    dependsOn test
    baseDirFollowsSourceFile()
}

task copyDocument(type: Copy) {
    dependsOn asciidoctor

    from file("build/docs/asciidoc")
    into file("src/main/resources/static/docs")
}

bootJar {
    dependsOn copyDocument
}- 기존 build.gradle에 위와 같은 코드를 추가한다.
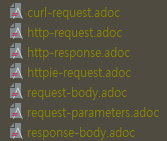
- 테스트 코드 실행 및 성공 시, snippetsDir로 설정한 경로에 아래와 같은 .adoc파일이 생성된다.
- curl-request.adoc
- http-request.adoc
- http-response.adoc
- httpie-request.adoc
- request-body.adoc
- response-body.adoc
- 프로젝트 build 시, asciidoctor 과정이 실행되어 src/docs/asciidoc 경로의 api-docs.adoc을 기반으로 html 파일을 /build/docs/asciidoc 경로에 생성한다.
- copyDocument 과정에서 생성된 html을 src/main/resources/static/docs로 복사한다.
2. 테스트 코드 작성
@ExtendWith(RestDocumentationExtension.class)
class ControllerTest {
    @BeforeEach
    void setUp(ApplicationContext applicationContext, RestDocumentationContextProvider restDocumentation) {
        this.webTestClient = WebTestClient.bindToApplicationContext(applicationContext).configureClient()
                .filter(documentationConfiguration(restDocumentation))
                .build();
    }

    @Test
    @DisplayName("테스트")
    void 테스트() throws Exception {
        // given
        User testUser = TestProvider.createTestUser();
        LinkedMultiValueMap<String, String> formData = new LinkedMultiValueMap<>();
        formData.put("email", List.of(testUser.getEmail()));
        formData.put("password", List.of(testUser.getPassword()));
        formData.put("name", List.of(testUser.getName()));
        formData.put("nickname", List.of(testUser.getNickname()));
        formData.put("age", List.of(testUser.getAge().toString()));
        formData.put("gender", List.of(testUser.getGender()));

        // when & then
        webTestClient.post()
                .uri("/api/v1/auth/sign-up")
                .body(BodyInserters.fromFormData(formData))
                .exchange()
                .expectStatus().isCreated()
                .expectBody()
                .jsonPath("code").isEqualTo(201)
                .consumeWith(document("snippets 생성 경로", requestParameters(
                        parameterWithName("email").description("이메일").attributes(field("example", testUser.getEmail()), field("length", "0-20")),
                        parameterWithName("password").description("비밀번호").attributes(field("example", testUser.getPassword()), field("length", "10-15")),
                        parameterWithName("name").description("이름").attributes(field("example", testUser.getName())),
                        parameterWithName("nickname").description("닉네임").attributes(field("example", testUser.getNickname())),
                        parameterWithName("age").description("나이").attributes(field("example", String.valueOf(testUser.getAge()))),
                        parameterWithName("gender").description("성별").attributes(field("example", testUser.getGender()))
                )))
                .consumeWith(System.out::println);
    }
}- @ExtendWith(RestDocumentationExtension.class)를 테스트 클래스에 적용한다.
- setUp 메서드를 사용하여, WebTestClient에 Rest-Docs를 사용할 수 있도록 적용한다.
- document()를 사용해서 설정한 내용을 바탕으로 .adoc 파일을 snippets 생성 경로에 생성한다.
- build/generated-snippets/{지정한 경로}에 위와 같은 .adoc 파일이 생성된 것을 확인할 수 있다.
3. api-docs.adoc 파일 작성
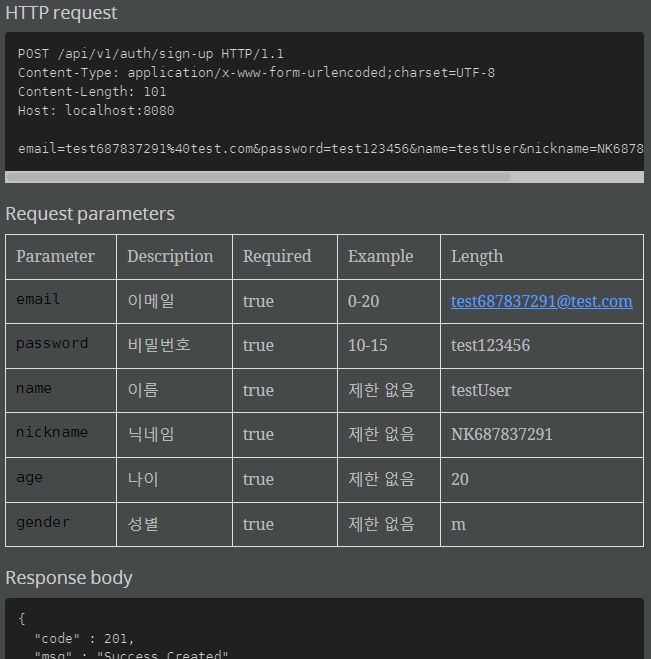
operation::{파일 경로}[snippets='http-request,request-parameters,response-body']- build/generated-snippets 아래의 파일 경로를 적용한 뒤, 위에서 생성된 .adoc 파일 중 사용하고 싶은 파일을 snippets=''에 작성한다.
- AsciiDoc 플러그인을 사용하면, 다음과 같은 파일 결과를 미리 볼 수 있다.
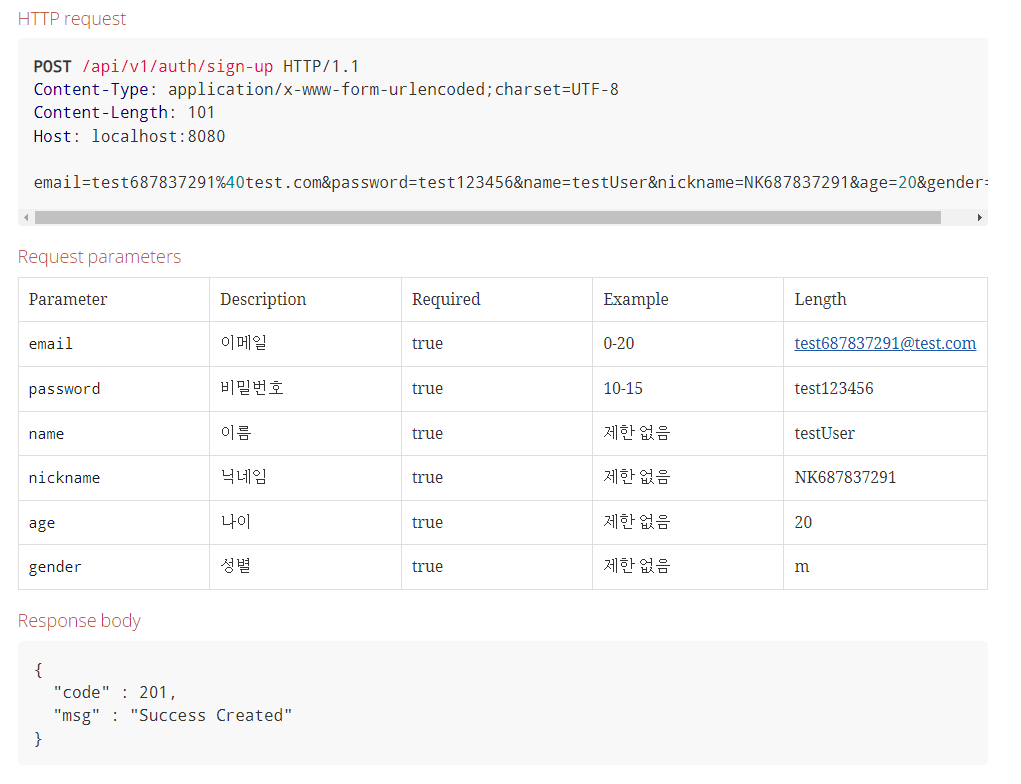
4. project build
- 터미널에 ./gradlew clean build 명령어를 입력한 뒤, resources/static/docs/api-docs.html 파일을 확인하면 다음과 같은 결과를 확인할 수 있다.
'Backend > Spring' 카테고리의 다른 글
| [Spring] checkstyle 적용하기 (0) | 2023.05.03 |
|---|---|
| DDD(Domain Driven Design)란? (1) | 2023.04.03 |
| [Spring] 알림 기능에 SSE 적용하기 (0) | 2022.11.25 |
| [Spring] Logback 설정 (0) | 2022.11.16 |
| [Slf4j] Slf4j란? (0) | 2022.09.19 |


